
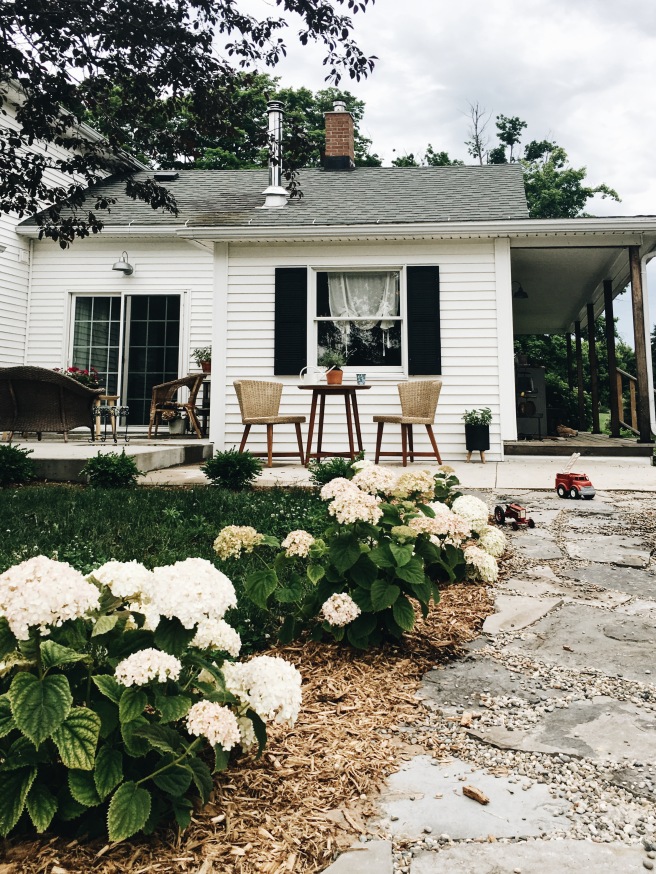
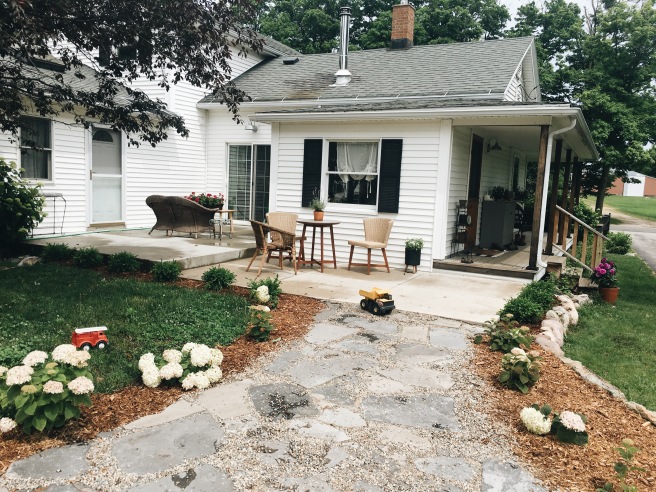
 Hi you guys! I am soooo excited to finally share the walkway we’ve been working on for a few weeks now! I think it completely changed the look of the back of the home and patio, and I am so pleased with how it all turned out!
Now of course, I wish I had a before photo. And I always seem to say that! But here, I did find this one. You can see the plain square edges of the patio without any life or softness around it!
Now how did this all begin. Well folks, I took our one year old with me in the truck, and headed to Greenleaf Landscape supply. I had no idea what I was going to get or how to even go about this big project, but you have to start somewhere right?!
Lucky for me I found some amazing help! And if you’ve been wanting to do a big landscaping project, but don’t know where to begin, I HIGHLY recommend going to Greenleaf and talking to Anne! I told her I wanted to do a flagstone walk way and that was about it! I am so lucky to have met her and for her advice on how to go about the whole project. (It was a little more complicated than I imagined!). But I am still so glad we did it, and that we did it right.
Okay, so what did I pick and how did we do it?
First off, there are mannnyyy different choices of flagstone (also I did not know this either!). You can take a look at the Greenleaf’s website here to find all their selections available. I ended up going with their Carmel Mint flagstone. The photos do make it look purple, and more colorful that I was looking for, but in person I think it’s perfect! I wanted a stone that wouldn’t chip easily, and that also looked irregular for a very natural looking walkway.
Now once we got these stones home, we had a lot of work to do! First we shoveled off the sod and leveled the walk how we would like it. Next we laid landscape fabric down and laid the stone how we would like them to look. Then hubby brought over a load of sand to set the stone. I will say Greenleaf suggested we use “chips and dust,” and if you are doing this I would listen to them! We didn’t have chips and dust, and with a topper on our truck right now I couldn’t bring a bucket load home. Plus we already have sand on this property so we thought we would give that a whirl. (But do as I say, not as I do ;-P). The goal is to get these flat stone from moving as you walk on them. So having them good and set is very important! They hubby drove the tractor over them to push them down in the sand, and we also wet the sand to make it hard. (Again not sure if that was all right, just being honest in what we did!). The next day bought just a few bags of pea stone from a local store and sprinkled them between the stones.

And their you have it! The walk way is done!

Now onto the plants! My sweet friend and neighbor with Contained Gardens helped me design this little area. I purchased the number of plants I needed with her, and kept it simple, low maintenance, and most importantly- budget friendly! I know I also reached out to my friends on social media for input on what plants to get. And you know you guys were completely 50/50! I ended up going with hydrangeas invincible wee whites. Which grow to 1-2.5 feet tall. They are a dwarf Annabelle (the classic white hardy hydrangea), and I love them lining the walkway! Next, I chose boxwood to line the patio. I love how they stay green year round, and how I can pick small springs for the holidays! And did I mention, BOTH should be completely no maintenance?! HAPPY DANCE!
As always, thank you for stopping by and let me know if you have any questions!

