A Little Design Tip

I get asked so many times about how I decorate or if I can help give ideas on how to decorate.  And as flattered as that makes me feel, I want to help!  So I thought I could put something together to describe some different styles and what I like best in my decor.

  1. Farmhouse (This is very me)
  2. Industrial (I love a touch of this, but not too much)
  3. Nautical (I’m sorry, but this is personally my least favorite)
  4. Scandinavian (I looovvveee this)
  5. Bohemian
  6. Urban Modern
  7. Shabby Chic (Every summer I love a touch of this)
  8. Mid-Century Modern

Now I won’t cover them all.  But I want to talk about my style and tips I have learned along the way.  The biggest and most important thing in my book is to have a neutral base.  For us, we chose white trim, medium wood floors, and very neutral wall color choices.  If you don’t have any say on the trim or floors, at least try to paint the walls a neutral color and I promise it will be the best decision you ever make!  Just think about the holidays.  If you have orange walls, trying to decorate for Christmas would be a nightmare!

For our home I had wanted white white white.  Then it was the year of gray gray gray, so I joined the band wagon.  And one year later I have to say I regret it!  Our bedroom was a medium gray and I couldn’t bear it any longer.  I know now that almost all grays have a colored base.  And depending on natural sunlight that color would shine through.  The gray I had picked looked soooo blue in natural light. I HATED it! And a friend of mine said hers looked purple and pink.  Ugh.  Moral of the story, beware!

Now white white white is back in style.  My husband told me if we used white it would look like a dentist office, and why I listened to him I have NO idea!  (He also suggested to paint the stairwell Maroon. I should have known then he was stuck in the 90s.)  I should have just ignored him and did it anyways..  But instead, after too much peer pressure (why everyone took his side I have no idea) and him I chose the color Revere Pewter by Benjamin Moore. And its oookkkaayyyy.  But I still think I should have gone with white.  In the upstairs bedroom remodel that room I just painted white and it is called Alabaster by Benjamin Moore.

Okay, back to style.  I sometimes think my style changes as the wind blows, but if you are like that too, thats okay!  You just have to make sure it flows.  And everything is good with moderation.  I need that reminder from time to time, especially when I find something I love.  At one time when chalk was really “in” I think someone came over (one of Doug’s friends) and laughed at all the chalk boards.  I was embarrassed!  For a man to notice something I must have gone over board.  And now I am so into signs.  My friend had to remind me not to get too “sign happy.”  With that being said that is one more piece of advice 🙂

So now you have a neutral base.  Now where to begin?  I’ve gone through phases where I’ve had patterned rugs, curtains and with fun colors. But don’t do it.  Again, it is hard to decorate for the seasons, and they get old!  I finally settled on tie-up shades from target.

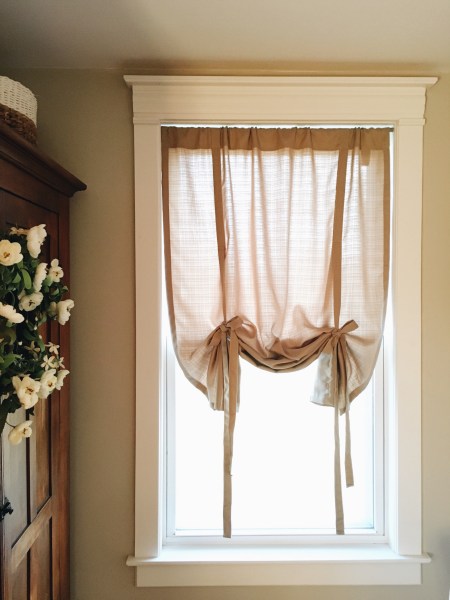
But now I just heard about drop cloth curtains.  And I think its genius.  Beautiful texture and a perfect neutral pallet.

So you have neutral walls, curtains, rug, now how is that fun?  Well you can buy any new beautiful piece and I promise it will POP.  From a fresh bouquet of flowers to a special painting or photo.  It will be the focal point and stunning 🙂

If you follow me on Instagram you have seen most of these photos.  But I wanted to show you how this map pops with all of its beautiful colors because it is on a white wall.

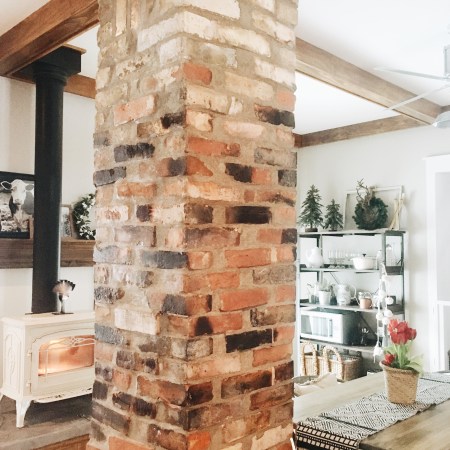
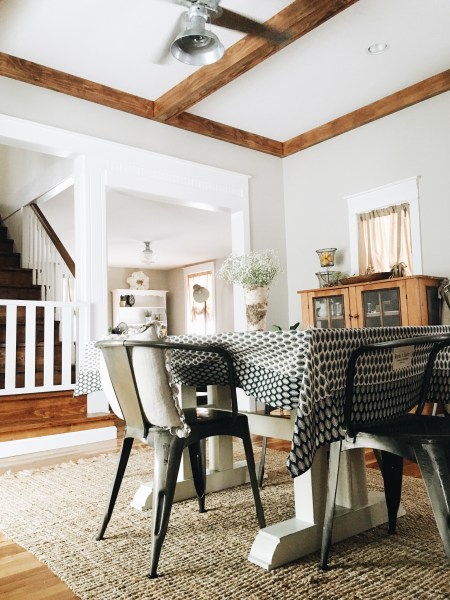
Here is a more broad photo to show my mixture of styles.

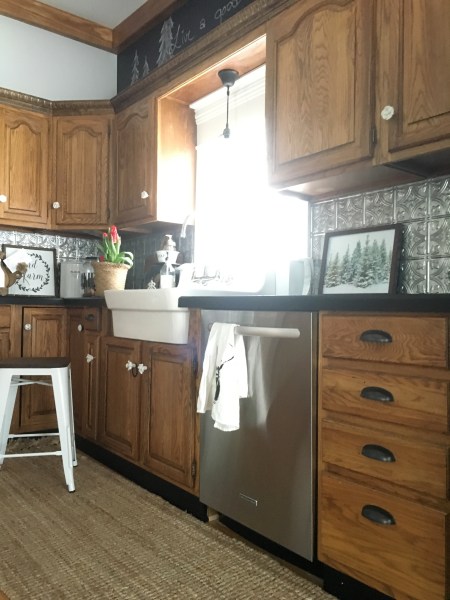
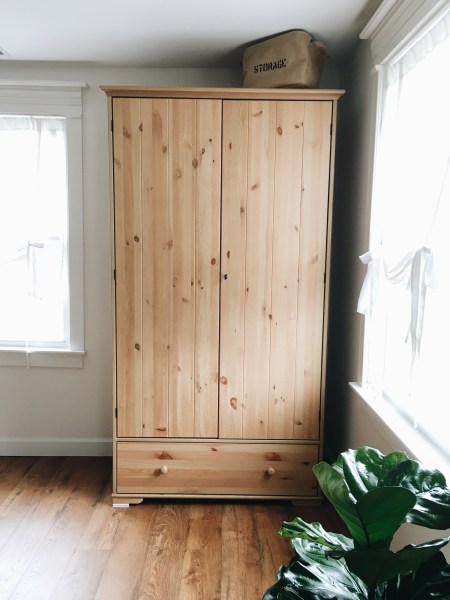
The coffee table is from World Market and very industrial with the metal.  And the chairs and couch are from IKEA, and all of their items are very Scandinavian.   The wardrobe is from a local barn sale and is an antique I use as a utility closet.  It is my way of adding warmth to the room with the medium wood tone, and it also adds that farmhouse touch. The pillows I change up often, but one simple change such as those can really change the feel of the room!  These are from H&M and add a tribal/western feel.   Oh, and that tray is from target and I love galvanized!  Very farmhouse/industrial.

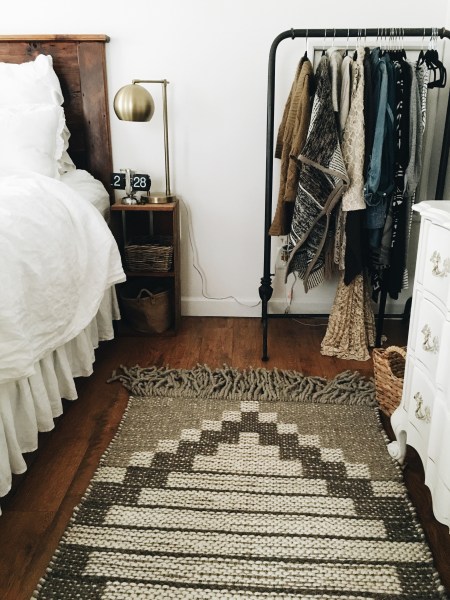
I wanted this picture to again show an overall so I can point out some things.  Deciding on just the right ceiling fan was soooo hard.  This was a splurge and is from Barn Electric.  It adds an industrial, but farmhouse feel with the light looking like a barn light. The metal chairs are from world market and again give that industrial feel with the metal.  If you are wondering if they are comfortable the answer is yes!  My husband even loves them… crazy right?!  The rug is sisal and I am eventually replacing it with a cow hide rug because lesson learned, these rugs are messy! Beware! But they sure are pretty right?!  And looking back at this picture I wish the flowers on the table where different.  Ones with color and hints of spring.  I have since bought purple hyacinths, they smell beautiful!

As always thank you for stopping by!  Feel free to ask any questions or add your own advice!  Hope you are having a wonderful day!

The Bedroom Make-Over

So two years ago when we started the home make-over, I swear grey was the “big” thing.  Now of course all I want is white white white.  With that being said, when Doug asked me to pick out paint colors.  He gave me an afternoon notice and I have pregnancy brain.  I quickly found out that grey is the HARDEST paint color to pick!  They either have a purple, blue, or green hue depending on certain light.  Who knew?!  Not me!  In my mind I thought a dark grey would be soothing, especially after the Today Show talked about how that is the best color to choice for its calming ability and for sleep.  WRONG. I hated it!  Even when Doug started rolling I cried inside at my choice.   The dark grey I chose looked bluer than blue in the light.  And of course I am all about natural light and every time those light beams shone in I cringed.

So that leads me to the remodel.  Just over one year later and the first poor choice in paint colors.  Oops!  I picked a day I didn’t have to work and brought all kinds of toys to the bedroom to entertain Auburn (which didn’t work).  The room was a mess and I had pushed as much furniture as I could to the center of the room.  After a day with a huge head start before Doug got home, I had only finished cutting in.  One coat….  Doug came home and saw the upstairs and was in shock.  I mean I tried to do as much as I could with a baby in the other hand?!  I find I don’t ask for permission,  only for forgiveness :)!

Doug jaw dropped and all said “I just can’t handle the chaos anymore, did you have to paint this now?!”  Well yes of course, because everything in my mind is an “urgent matter!” lol  So he changed his clothes, grabbed a beer and started painting.  What a good man right?!  I told him it was my project and I would finish it.  But lets be honest, I’m ADD with painting and get more on the floor and me than the walls.  AND he knows that ; ).

Here are a few photos of the bedroom progress.

The bedding is linen and from H&M.  I have to say, I wasn’t so sure about the linen at first.  My touchy feely husband I call him, has to have soft bedding.  At first he made some comment about the bedding feeling like sand, but after use and washing it, it has gotten softer and softer.  I truly do love it, wrinkles and all  🙂

Do you ever going shopping with something in mind and never seem to find that something?  Then you go shopping just for fun and find a million things you don’t need, but love?  That how this rug happened.  I went shopping last Saturday with a friend and this rug was calling my name…!  It is from World Market, and it was love at first sight 😉

Now I love how soft it is on my feet before bed.  The nightstand is a crate for a local barn sale, and that rack over there is hiding the attic door.  It is from Antique Farmhouse, link here clothes rack.  And I just adore it!  I kind of want another one for the nursery I’m thinking…..!  Oh and I just love that lamp too.  That is recently from Target.


If you follow my IG you might have seen this antique dresser called a commode. I bought it at the local antique store for 40$! A steal if you ask me!  I am in love with the decorative carved handles.  Even though I sometimes think it completely clashes with the headboard Doug built and the pine armoire across the room.  When I brought the nightstand home, I told Doug this was for him.  He said, “we will see, and don’t worry I won’t get attached.”  HA!  Am I really that bad?!   I love moving furniture because I fall in love all over again with the same pieces.  And it inspires me to clean ; )


And we recently moved this armoire out of Auburn’s room and into here. This is from IKEA and I debate often if I should stain it, paint it, or leave it be.  I love it as is, but with the medium stained doors, floors, headboard and more I am lost!  What do you think I should do?!

A for the newest addition to the bedroom…

A mantel!  I had been on a search for just the right mantel, but as my patiences wore thin, I thought i’d ask my best friends husband to see if he wanted a little side job.  It turned out better than imagined and I love how it gives so much warmth to the room.  I painted it to match the trim and added the decoy in the center from Lowes.  At this very spot, there use to be a chimney that ran along this wall.  It was long gone before we moved in, but we could see tell one had been there when doing the upstairs remodel.

And those signs are from one of my favorite etsy shops.  They are made by James and Alice, and I feel they are what makes this house a home.  Check out their IG or etsy shop and I promise, you won’t be disappointed 🙂

As always thank you for stopping by and have a wonderful day!

How I told Doug my Big Secret

I found out one morning so many weeks ago it seems. Of course it was on a week day, and I had to watch the clock slowly tick by as I waited for Doug to get home.  In preparation, that day I made his favorite dinner.  I set the table for four and waiting for him to walk in in wonder.  As expected he walked in and looked around.  He asked, “Who is coming to dinner?”   I looked at him with tears streaming and said, “No honey, we are going to be a family of four.”  Of course he ran over to give me a hug and kiss. Then immediately he looked at Auburn and said, “Did she tell you yet?! You’re going to be a BIG brother!”

As excited as I was to tell you all, I also feel so sad for those who can’t.  I know many people who have tried and tried and I couldn’t imagine how hard that must be.  I remember two years ago Mother’s Day we had been trying and we weren’t expecting yet.  I still remember the heavy heart I had on that day.  But for those that have felt that way come Mother’s Day, my heart breaks.  But I know God has a plan for each and every one of us.

With all of that being said, I am so thankful for you all and thank you for stopping by to share the excitement with us.  We are truly blessed and so thankful to have another 🙂

Here is an ultrasound from a few weeks ago.

I know by now baby is already much bigger, and it is true with your second one you grow so much faster. It was getting harder and harder to hide my growing belly before we announced.  I told on Friday when we went out to dinner, “I just can’t suck it in anymore!”

Thank you again for stopping by and sharing your excitement with us.  It makes me and this unborn baby feel SO loved!


The BIG Day

Auburn being my first child, and this being his first birthday, I felt a little more stressed this week than usual.  I know he will never remember this day, but I wanted to make it special, as I am sure, it is what most mothers want to do.  A friend told me this week that the first birthday is not only a big stepping stone for the child, but it is for you as well!  “It represents your first year as a mother!”  I never thought of it that way, but it sure is another good reason to celebrate!

Our theme for his party was lumber jack.  Auburn’s middle name is Hollis which means man of the woods.  So I thought, how fitting on this beautiful February day?!

I know the gold frame and purple tulips kill the manly lumber jack theme.  But hey, its a celebration of one year of motherhood too! And I think its pretty 😛

The cup cakes are sitting on a three tiered log tray made by my father for our wedding day.  And my mother-in-law found those cute trees and deer at a cake decorating store.  Annnndddd I have to admit, she made the cupcakes not me..  I won’t take credit even though I wish I could ; ) !   They are just SO cute!

Here is a close up of the top tier.

And I just loooovveee the little deer!

Now for a photo of Auburns cake!

He first picked off all the sprinkles and ate them. One. By. One…  Then finally he started to dive in.  Using both hands of course 🙂

\

This was him a few moments later.  Ohh man cake eating is hard work!

And I have one more thing to tell you all.

.

.

.

Coming this September,

Auburn is going to be a BIG brother!  

Crustless Quiche

I’ve made this quiche a million times, and thought today I should share it with others because I know they will love it just as much as I we do.

With Easter coming up this is the perfect recipe to use up that left over ham 🙂

(Did you know Easter is in March this year?!)

Well I never measure, but these are the ingredients: Ham, eggs, milk, cheese, flour, and onion. Thats it!  And salt and pepper to taste.

For those of you that need measurements I used about four deli slices of ham. 4 ounces of sharp cheddar cheese, 6 eggs, 1/2 cup of diced onions, 1 cup of milk, and 1/4 cup of flour.

Then bake at 350 until brown!  Or 30 minutes-ish I think?  I don’t ever use a timer.. :)!

Add or change a few ingredients to make it your own!  But this is by far my favorite breakfast dish!

Thank you for stopping by and I hope you and your family enjoy this as much as we do! Happy Sunday friends!


That Special Something

I am working with some beautiful and talented women who wanted me to share a story with you all about something special to me.  There are so many things when I look around the house that touches my heart, but this is that one thing that strikes that special place in my heart.

This dresser was my grandmothers.

This dresser was walnut and she painted it white.  I was told she painted every piece of furniture she had.  Most men cringe at the thought of painting over any wood furniture, but her husband encouraged her to “make it your own.”

Not only do I love it because I think it is beautiful, but for its warmth it brings my heart when I think of her.  I lived with her a summer during college to take care of her.  She was healthy as a horse physically, but mentally she had Alzheimer’s. One of the hardest diseases for family.  She didn’t know who I was, but would respond best with a smile. Every morning at breakfast she would look up at a painting on the wall and tell me a story behind it.  Somedays the story would change, but most days it brought her great joy describing it.  At times it was hard to have the patients to listen to that story one more time, but the joy she had talking about it made me have to bite my tongue and nod my head and smile.  Now, I wish I could hear her tell that story if for only one more time.

The upstairs was stripped to the studs. When we tried to plan the layout, I knew this nook at the top of the stairs would be made just for this.

The three tired baskets where my mothers, and she put this up here with the hydrangea picked from my flower gardens.

Thank you again for stopping by, and be sure to check out the other beautiful blogs about their own personal treasures 🙂

Kelly at Gratefully Vintage

Layla at My Sunset Avenue

Keila Bernowitz

Sarah at She Holds Dearly

Jessica at Honey N Hydrangea

Sarah at Little Vintage Nest

Brittany at Indigo and Honey

Oak Kitchen Nightmare

When we purchased the home it was last remodeled in the 1980’s and it showed.  The worst being the yellow oak cabinets.  But of course, it being real wood my husband absolutely would NOT let me paint them.  What it is it with men and not being able to paint wood??!  Well I had to figure something out.  I was never going to get my dream white kitchen.
I learned with this house remodel, sometimes you just have to pick your battles.  And this was one of them.  This leads me to my next DIY.  How to turn your yellow oak cabinets into something beautiful!

Here is just before we started.  (Sorry for the mess, I am terrible about doing good before photos- I just want it done!)

Where to begin..  Lucky for me my dad is very handy and knowledgeable about wood working and led the way.  I was nervous how they would turn out, but I learned you have lots of control with staining.  First off, the old finish needs to be removed.  Not stripped, just scuffed up enough for the new stain to penetrate the wood.
To do this, the first step is to take 220 sand paper and lightly sand the cabinets.  Remember with sandpaper also to go with the grain.  Next we took a Scotch Brite scouring pad to further scuff up the old finish.  These come in packs and are less than 5$ at the store.  I used a Heavy Duty Scotch Brite.  After a few hours of scrubbing each door and cabinet, a rag was used to clean off leftover dust and dirt.  With a clean and dry surface, we were ready to stain!
Now, here can be the tricky part.  Being that the cabinets were not stripped, whatever stain you pick, the cabinets will not be that exact color.   Also to note, depending on the stain and how long you let the stain penetrate, this will ultimately affect the finish look.  I recommend practicing on a place that won’t be easily seen as a test area. I ended up choosing a Dark Walnut Minwax stain.  As I said earlier, the longer you let it sit the darker the finish.
After applying the stain with either a rag or a sponge brush, use a clean rag to rub off the stain.
I added this last picture to show what the cabinets looked like after just applying the stain before wiping.  Don’t let this dark look scare you if this is your first time staining.  Most of it wipes off, but the grain in the wood turns darker.
Well, I am not the best picture taker.  But hopefully you can see the difference!  Oil based Polyurethane as it ages tends to turn wood a yellowish color.  Because of this most choose to go with a water base poly, BUT I will say from my experience water base polyurethane does not hold up as well, and in time and requires more maintenance. For this reason, and being that the kitchen cabinets take a great deal of abuse, I chose again to apply the finish coat with an oil based polyurethane satin finish.  I believe the oil base polyurethane brings out the grains of the wood.  Yes, there is much debate on what to use and which one is better, but ultimately it is a personal preference 🙂
Thank you for stopping by and let me know if you have any questions!
Have a great day! 🙂

I Just Want BRICK!

Hello all!  Many have asked how did we refinish the chimney?  So, I thought I would share what we did!

But first a little background story on getting to that point 😉

I have to start by saying, poor Doug.  I will admit, I was one of those nagging housewives, begging him to start on a few house projects.  I didn’t like anything.  From the vinyl floors to the cheap wood paneling and wallpaper.  It was a constant battle trying to make your new home “your own,” all while fighting the ugly blue wallpaper that made decorating for Christmas a nightmare.  Well, after a little too much DIY telvesion and Nichole Curtis on Rehab Addict, I think he had enough.  If you have ever watch Rehab Addict you would know at the beginning of each show, they show her uncovering brick behind a wall saying, “I just want brick!”  Doug had always known we had brick hidden behind our cupboards, yet I was oblivious of this the entire time.  He had watched a few of her shows unwillingly to say the least and after he spilled the beans to me that we ourselves had brick hidden, I wouldn’t let it go!  Every day I would chant, “I just want brick!!!”  Then finally he had it.  While eating steak dinner I made for us in our simple old farmhouse he got up and at that moment decided he would show me.  With the cupboards full of baking supplies he unloaded the shelves on the floor and said, “Well here you go!! There is no turning back now!”
Sadly to my disappointment, the brick was nothing like what I had seen on Rehad Addict or any Pinterest photo I had seen.  The brick had pink plaster stuck to it and the mortar was corroded.  Even the bricks themselves weren’t the pretty red I had imagined.  They were orange and brown and stacked crooked.   Doug named it, “The Leaning Tower of Pisa,” and he too wanted to remove it.
This photo is a few days later after much more mess and demolition.
Now that you have seen the before photos and a long and probably boring story, here is my how to-
We used wire brushes and muriatic acid to clean the brick.  I think I’ve heard the saying, “a little bit of elbow grease goes a long ways.”  Well that may be true.  But with this mess it was most like A LOT of elbow grease.  After hours of using scrapers, flat blade screw drives and wire brushes it finally was starting to look better.  Next, it had to be re-grouted.  To do this Doug had to purchase a tool called a “Tuck Pointer.”  He then spent hours removing the old grout and then re-grouting.  He told me he lost his finger prints with this job and was now somehow “unidentifiable.” (My husband thinks he’s funny.)  After the new grout and another good cleaning, the brick was finally looking better!
Lastly, he used an oil base cement sealer and rolled it on with a paint roller. The fumes were SO bad so if you are going to do this, I would highly advice being gone  with windows and doors open as long as possible!
Here she is 🙂
There was a whole in the chimney for a vent for a wood stove I am assuming back in the 1800’s, so I covered it with this clock.  Good thinking right?!  I bet you never would have guessed!
Thank you again for stopping by!  I hope you have a wonderful day and feel free to ask any questions!

Basket Lighting

basket lighting

Hello everyone!

I’ve had a few people ask me how I made my basket lights and I wanted to share.  I have one in our mudroom and laundry closet. It is SO easy its almost silly to blog about. 😉


You need to simple things.  A basket you love, and a porcelain light.  We actually used porcelain lights while in the demolition phase and had many left over. But for only a few dollars, you can pick one up at the hardware store.

This basket I used was from my mothers basement.  I think it is called an antique egg basket, but I am sure Homegoods would have just what you need!

All you have to do is cut out the very center at the bottom of the basket, or with a basket like this, no cutting was needed.  I just pinched the wire at the neck of the porcelain light and it sits on their nice and snug!

Oh and p.s., that is a galvanized rod I used as a curtain rod!

Thank you again for stoping by and I hope you have a wonderful day!


Fiddle-Leaf Fig

fiddle leaf fig

Just a few months ago, I had never heard of a fiddle-leaf fig.  Then I met Rachel, and was exposed to the wonderful world of Instagram.  Then over and over and saw this plant!  I made it my goal for 2016.

But finding one wasn’t as easy as I had hoped.  I was half tempted to order one from Amazon…  what doesn’t Amazon have for sale?!

Finally I found a small selection at Home Depot.  This beauty ran me $8.88, Score!

I then headed to Target for a basket.  I love the texture the basket adds to the plant.  And it must have been my lucky day because the dollar spot wasn’t totally picked over yet (That never happens at my target). Oh annndd this basket was $10 on clearance! 🙂

The basket is deep and funny shaped being skinny at the top and wide at the bottom. The plants sat in it too low, so I stuck a metal cake plate I had in the bottom.  It gave it the perfect height so all of the leaves stick out for sun light.  Of course you can use anything, a box would probably work just fine (Rachel Butcher gets all the credit for that idea) 😉

Care for these beauties might you wonder?  When I brought it home the leaves where dirty and dusty.  I took a paper towel and dabbed milk on it.  I read somewhere that the protein in milk is great for plates and helps make them stronger.  It also gives the leaves a beautiful shine.  I have heard many people say the do best in a room with lots of natural light or in front of a window.  They do well in climate 60-90 degrees, fertilize monthly, and water to maintain moderately moist soil.

Thank you so much for stopping by and hope you have a wonderful day 🙂